How to Test an Immersion Heater: A Comprehensive Guide for Homeowners
Warning: This guide is intended for trained heating or electrical tradesmen. If you are not familiar with electrical systems, always contact a certified professional for assistance.
An immersion heater is a key component in many UK homes, designed to heat water using electricity. Typically installed in the side of a hot water cylinder, it heats the water inside the cylinder. Often, there are two immersion heaters: the top one is used to heat the layer of water at the top of the cylinder quickly during the day, while the bottom one heats the entire cylinder overnight, taking advantage of lower energy tariffs.
In this guide, we’ll explain how to test an immersion heater, including performing an element test, thermostat test, and earth connection test. We’ll also cover safety precautions, troubleshooting, and maintenance tips to ensure your system operates efficiently.

How an Immersion Heater Works
An immersion heater is equipped with a thermostat, which regulates the water temperature in the cylinder. The thermostat can be set to a specific temperature, usually between 60°C and 65°C. Newer immersion heaters include a safety cut-out device, which permanently breaks the connection in the thermostat if the water temperature reaches 90°C. This prevents the system from overheating and protects both the immersion heater and your home.

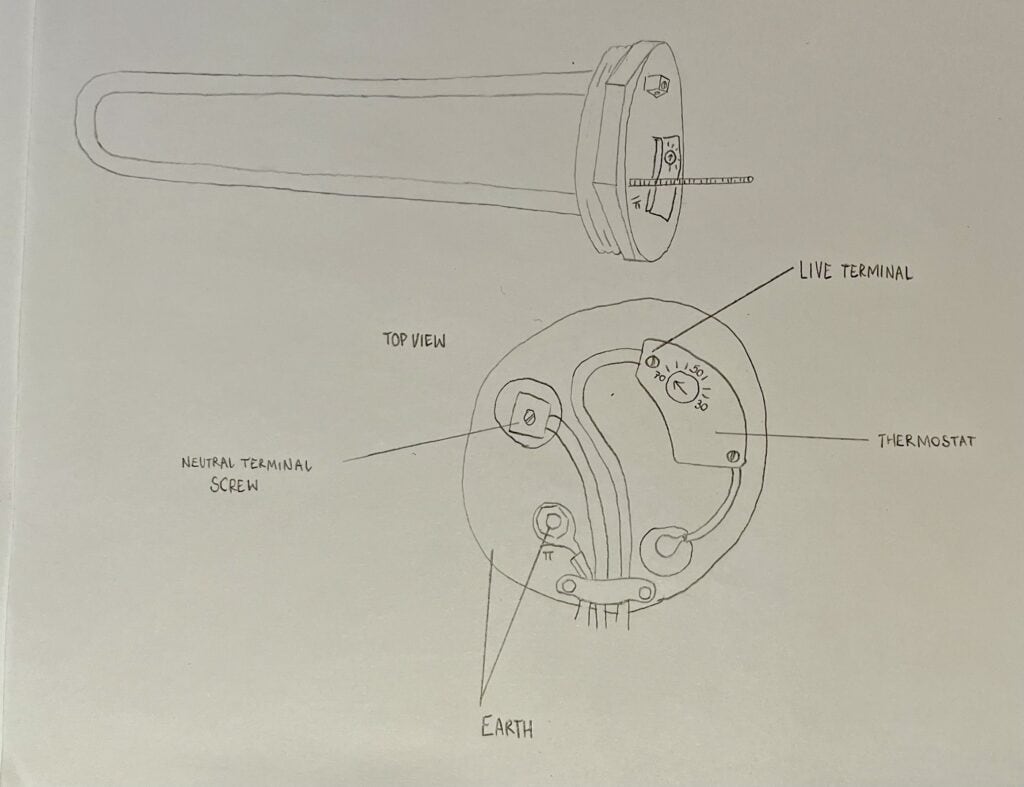
The live, neutral, and earth wires are connected as indicated in the diagram, with the thermostat controlling the water temperature by switching the heating element on and off as needed. When the heating element is on, it warms the water to the desired temperature.
Important Safety Note:
When performing any work on an immersion heater, ensure that the wiring is completely disconnected from the mains, not just turned off. This is because the heater could be on a timer and might turn on unexpectedly, posing a safety risk.
Why Testing Your Immersion Heater Is Important
Like all electrical devices, immersion heaters can develop faults over time. Regular testing helps ensure the system operates safely and efficiently. Failing to address issues like a faulty element or thermostat can lead to:
- High energy bills: If the heater remains on longer than necessary, it will use more electricity.
- Overheating: A malfunctioning thermostat can cause dangerously high water temperatures.
- Boiling water overflow: If the immersion heater doesn’t shut off properly, it can cause boiling water to spill into the feed and expansion tank in the loft. Since modern tanks are made of plastic, they cannot handle extreme temperatures and may melt, causing significant damage. Although, in an effort to combat the risk of a plastic tank deteriorating under extreme heat, Part G of the Building Regulations (2010) states that all feed and expansion tanks installed after its publication must be secured to a plinth that extends for at least 150 mm from every side of the tank.
Understanding how to test an immersion heater ensures you can spot problems early, avoid costly repairs, and keep your heating system running smoothly.
Common Signs Your Immersion Heater Needs Testing
Before you begin testing, look out for these signs that your immersion heater may need attention:
- No hot water: A lack of hot water could indicate a failed heating element.
- Water is too hot: If the water temperature is too high, it could point to a faulty thermostat.
- Strange noises: Gurgling or hissing sounds from the cylinder may suggest an issue with the heating element.
- Higher energy bills: A sudden spike in your electricity bill might indicate that the heater is running continuously.
- Leaking water: Water leakage near the heater or cylinder could indicate overheating or element damage.
If you encounter any of these problems, it’s time to test your immersion heater.
Tools You’ll Need to Test an Immersion Heater
To begin testing your immersion heater, gather the following tools:
- Multi-Meter: Used to measure resistance (ohms), voltage, and continuity.
- Insulated Screwdriver: For the safe removal of the immersion heater cover and access to the electrical terminals.
- Voltage Tester: To confirm that power is fully disconnected before starting any work.
- Protective Gloves and Goggles: To safeguard against electrical shocks or water splashes.
- Replacement Parts: Depending on your test results, you may need a new element or thermostat.
How to Test an Immersion Heater: Step-by-Step Guide
Once you have your tools ready and have disconnected the power, you can proceed with testing the immersion heater. This includes testing the element, thermostat, and earth connection to ensure all components are functioning correctly.
1. Testing the Immersion Heater Element
The heating element is responsible for warming the water in the cylinder. If it’s faulty, the water won’t heat properly.
- Step 1: Set your multi-meter to the lowest ohms setting (resistance), typically around 200 ohms.
- Step 2: Test the multi-meter by touching the prongs together. The reading should match the setting on the dial, indicating the meter is functional.
- Step 3: Disconnect the wiring from the immersion heater terminals. Place one prong on the live terminal and the other on the neutral terminal of the element.
- Step 4: A working element should show a reading of around 15 to 25 ohms. If the meter shows an overload or no reading, the element has deteriorated and needs replacing.
2. Testing the Thermostat
A faulty thermostat can cause the immersion heater to run continuously or not at all. Here’s how to test it:
- Step 1: Leave the multi-meter set to the lowest ohms range.
- Step 2: Place one prong on the live terminal connected to the element and the other prong on the mains terminal of the thermostat.
- Step 3: If the water in the cylinder is cold and the thermostat is set to 65°C, the meter should show a connection, meaning the thermostat is allowing power to the heating element. Please note that if the water in the tank is warmer than 65°C, a functioning thermostat will have cut out and no resistance will be detected.
- Step 4: To further test, lower the thermostat’s temperature setting to its minimum. The connection should break, indicating the thermostat is functioning properly by cutting off the power when the set temperature is reached.
Safety Feature: New immersion heaters include a safety device that will permanently cut off the thermostat if the water temperature exceeds 90°C. This device must be manually reset to restore function.
3. Testing the Earth Connection
Finally, the last part in learning how to test an immersion heater is the earth connection is essential for safety, ensuring that any stray electrical currents are safely directed to the ground. Here’s how to test it:
- Step 1: Set the multi-meter to the highest ohms range.
- Step 2: Place one prong on the live terminal and the other on the earth terminal (typically on the brass casing of the heater).
- Step 3: The meter should display an open circuit with maximum resistance. If there’s any reading, it indicates a fault and the immersion heater could be unsafe to use.
When to Call a Professional
While this guide explains how to test an immersion heater, certain issues require professional expertise to ensure safe and proper repairs. If you encounter a faulty element, damaged wiring, or any electrical problems that you’re not comfortable fixing, it’s always best to call in a qualified heating engineer or electrician. If you’re in Cheam, Sutton, or Surrey or 15 mile radius, contact Warma Heating and Plumbing for expert assistance and reliable service.
Situations where you should call a professional include:
- Complete heater failure: If the heating element or thermostat needs replacing, it’s safer and more efficient to hire an expert for the job.
- Wiring issues: Any problems related to the electrical wiring or connections should be handled by a certified professional to avoid safety risks.
- Leaking cylinder: If you notice water leaking from the immersion heater or cylinder, it’s essential to contact a professional immediately to prevent water damage and potential system failure.
If you’re located in Cheam, Sutton, or Surrey or 15 miles radius around us, or there abouts, look no further than Warma Heating and Plumbing. Our certified engineers are experienced in diagnosing and repairing all types of immersion heater issues, ensuring your system is restored safely and efficiently. Whether it’s replacing faulty parts, resolving wiring issues, or performing a full system check, our team has the expertise to get the job done right.
Don’t hesitate to contact Warma Heating and Plumbing today to schedule an appointment and let our experts handle the job, giving you peace of mind and a fully functioning heating system.
Maintaining Your Immersion Heater for Longevity
To keep your immersion heater running efficiently and to avoid future problems, it’s essential to perform regular maintenance. Here’s how:
- Annual Testing: Perform a yearly check on the element, thermostat, and earth connection to catch any issues early.
- Monitor the Temperature: Keep the thermostat set between 60°C and 65°C to balance energy efficiency and safety.
- Insulate the Cylinder: Adding insulation to your hot water cylinder can prevent heat loss, reduce energy consumption, and save on bills.
- Professional Servicing: Schedule an annual service with a certified heating engineer to ensure the entire system, including the immersion heater, is in good working condition.
Conclusion: The Importance of Testing Your Immersion Heater
Knowing how to test an immersion heater is essential for maintaining a safe and efficient hot water system. By regularly checking the element, thermostat, and earth connection, you can prevent potential issues, avoid costly repairs, and ensure your heating system runs smoothly. If you’re ever unsure about a problem or need help with repairs, don’t hesitate to contact a professional for expert assistance.


